Available with v.4.13.0
Learn how to review verbatims, assign MedDRA codes, approve them, and split multi-term verbatims from the Medical Coding module.
TABLE OF CONTENTS
- 1. Opening the Medical Coding module
- 2. Reading the verbatim overview
- 3. Reviewing a verbatim in the side panel
- 4. The coding view: searching MedDRA and applying a code
- 5. Splitting a verbatim into multiple terms
- 6. Queries on verbatim fields
- 7. Auto-coding and confidence
- 8. Exporting medical coding data
- 9. Access rights at a glance
Definitions:
- Verbatim = the free-text clinical term entered by a site user in a form field designated for medical coding (for example "elevated liver enzymes"). When the verbatim is split, each resulting term is referred to as a split term.
- MedDRA hierarchy = the five-level terminology used for coding: LLT (Lowest Level Term) → PT (Preferred Term) → HLT (High Level Term) → HLGT (High Level Group Term) → SOC (System Organ Class).
- Confidence = the internal score the system attaches to an auto-coded result, shown as High, Medium, or Low.
1. Opening the Medical Coding module
2. Reading the verbatim overview
The verbatim overview is the main workspace of the Medical Coding module. Each row represents one verbatim captured from a scheduled event form or from an (S)AE form. The newest updates are at the top by default.
⭐ Good to know: All verbatims configured for the study are visible to every user with the "Medical Coding: Read" right — regardless of their site access or form permissions. This makes the overview a cross-site coder workspace. Permissions on individual actions (update code, navigate to form, approve, etc.) are still enforced. |
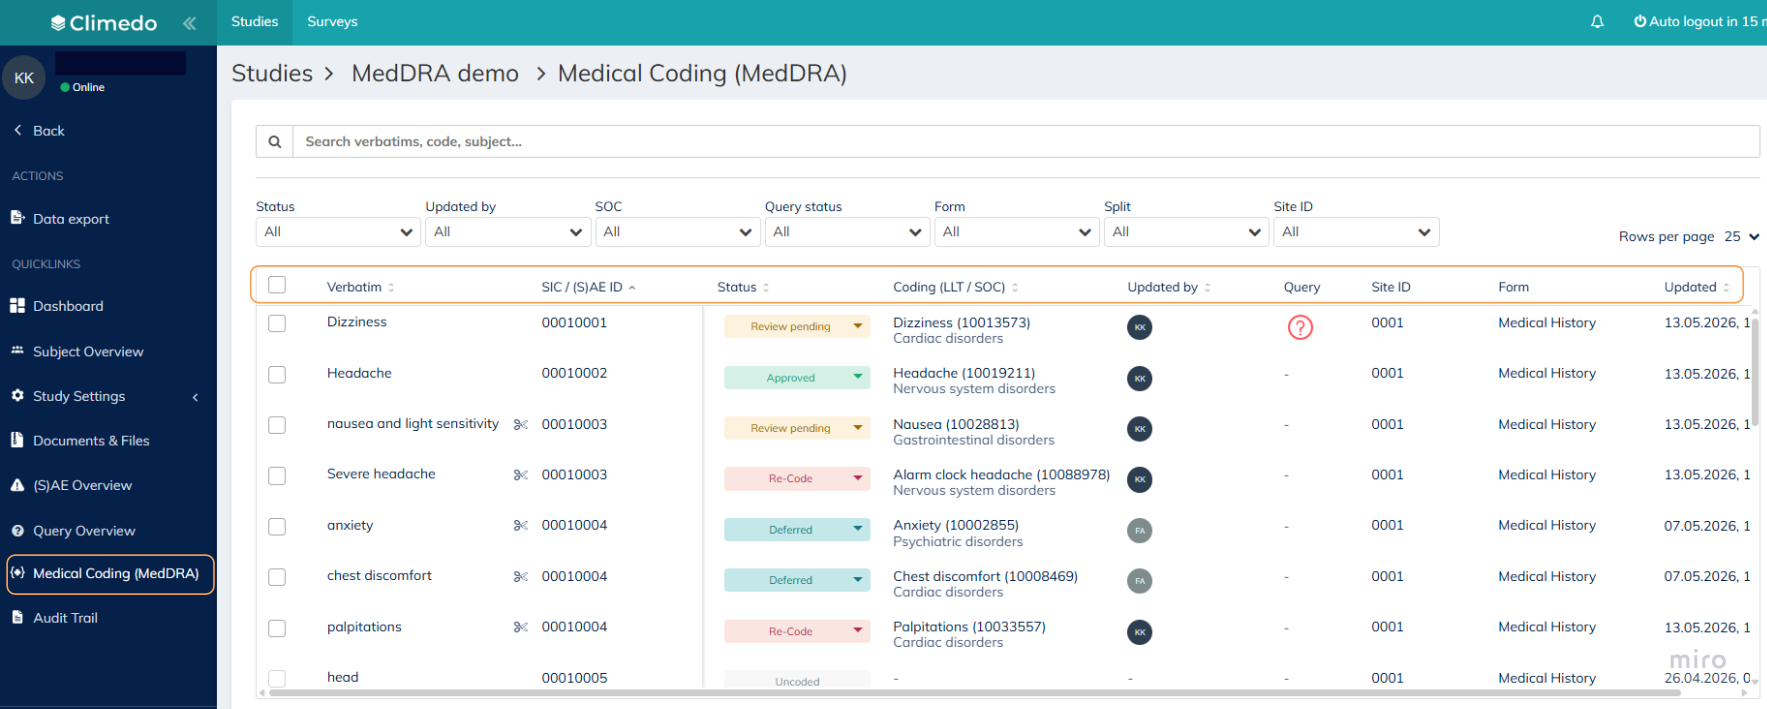
2.1. Columns and what they show
- Checkbox — for selecting rows for bulk status updates (see Section 2.4).
- Verbatim — the most recent value of the verbatim field as it appears in the eCRF. If the text is cut, hover over it to see the full value. A scissors icon (✂) next to the text indicates a split term (see Section 5).
- SIC / (S)AE ID — the subject identifier when the verbatim comes from a scheduled event, or the (S)AE identifier when the verbatim comes from an (S)AE form.
- Status — the current coding status (see Section 2.2).
- Coding (LLT / SOC) — the LLT name with its numeric code in brackets on the first line, and the SOC name below it. Empty ("—") if the verbatim is not yet coded.
- Updated by — the initials of the person who most recently changed the code or status. If the most recent change was the system's auto-coding, a system icon is shown with a confidence-colored border: green for High, yellow for Medium, red for Low. Hover the initials to see the full name, or the auto-coding tooltip with the confidence value.
- Query — an indicator of the query status on the underlying verbatim field (see Section 6).
- Site ID — the site associated with the subject or (S)AE.
- Form — the display label of the form holding the verbatim field. Hover shows the field, row label (for table fields), form, and step.
- Updated — the timestamp (CET) of the most recent meaningful change to the coding record (new verbatim captured, code added or changed, status changed, auto-coding applied).
2.2. Verbatim statuses
Each verbatim carries one of five statuses, colour-coded to match the consent status convention already in use in Climedo:
- Uncoded (grey) — no code has been assigned yet. Auto-coding either did not return a result or the code has been removed.
- Review pending (yellow) — a code has been applied (by auto-coding or manually) and is awaiting confirmation.
- Approved (green) — the code has been confirmed by a user with the Approve right.
- Re-code (red) — the code has been flagged for redoing, usually because the verbatim text changed or the existing code is incorrect.
- Deferred (blue) — coding work on this verbatim is paused.
⚠️ Important: Uncoded is not selectable from the status dropdown; the system assigns it automatically when no code is present. Users without the Approve right do not see Approved in the dropdown, which means they can move a verbatim out of the Approved status but cannot move one into it. |
2.3. Sorting, searching, and filtering
The overview is sorted by the Updated timestamp (newest first) by default. Any column header marked as sortable — Status, Verbatim, Coding (LLT), SIC / (S)AE ID, Form, Updated by, and Updated — can be clicked to re-sort the table.
The search bar at the top searches across multiple fields at once: verbatim text, LLT code and name, SOC name, SIC / (S)AE ID, form, Site ID, status, and dictionary version. Search applies on top of any active filters.
Six filter dropdowns sit above the table:
- Status — any of the five statuses listed above.
- Updated by — a list of collaborators plus "Auto-coding" (always shown as the first option).
- Confidence — High, Medium, or Low. Only shown when Updated by is set to Auto-coding.
- SOC — the distinct SOCs present among coded verbatims in the study.
- Form — the forms configured for medical coding in Step 7.
- Site ID — all sites in the study.
Filters are multi-select: options within one filter combine with OR logic, and separate filters combine with AND logic. The "X" icon on a filter clears that filter; an overall "X" next to the search bar clears everything. Filter selections and the last search term are saved per user so they persist across sessions.
2.4. Bulk status updates

Selecting one or more rows via the checkboxes reveals a row of status buttons above the table on the right. These buttons let multiple verbatims be moved to the same status in one action.
- Apply any filters or a search to narrow down to the cohort to update.
- Use the header checkbox to select all matching rows (across all pages of the filtered result, not only the visible page), or click individual checkboxes for a specific selection.
- Click the status button for the target status: Review pending, Deferred, Re-code, or Approved.
A success message confirms the update, or an error message lists the issue if no eligible rows were found.
⚠️ Important: "Select all" with filters active selects every matching verbatim across all pages, not just the ones visible on screen. Confirm the filters before triggering a bulk update. The system excludes rows that the user does not have permission to update (for example Approved on a site without Approve rights), archived rows, and rows already in the target status. |
3. Reviewing a verbatim in the side panel
3.1. Opening and reading the side panel
Clicking any row in the overview opens a side panel on the right.
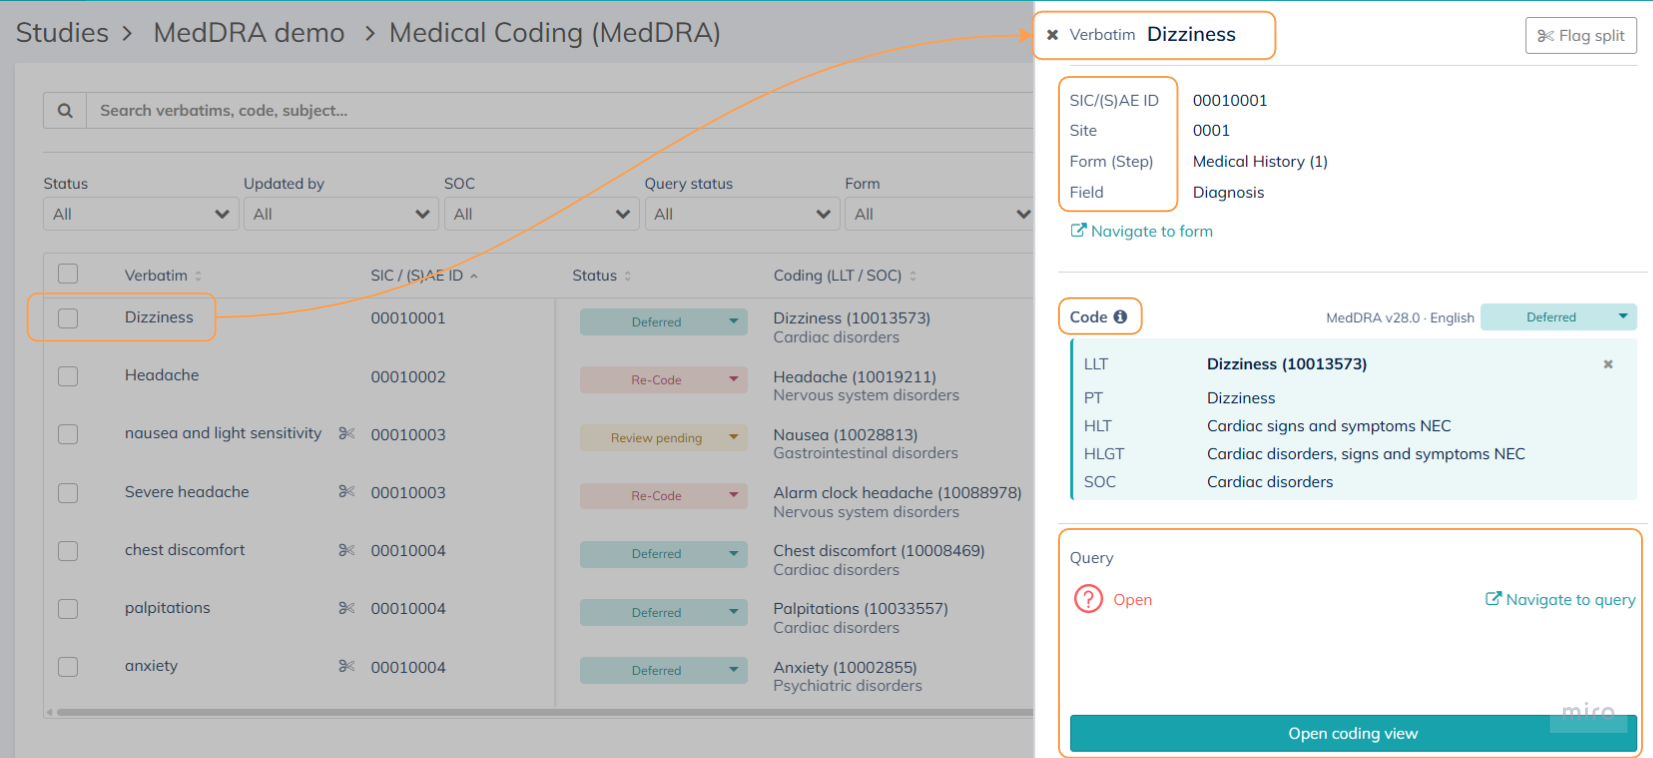
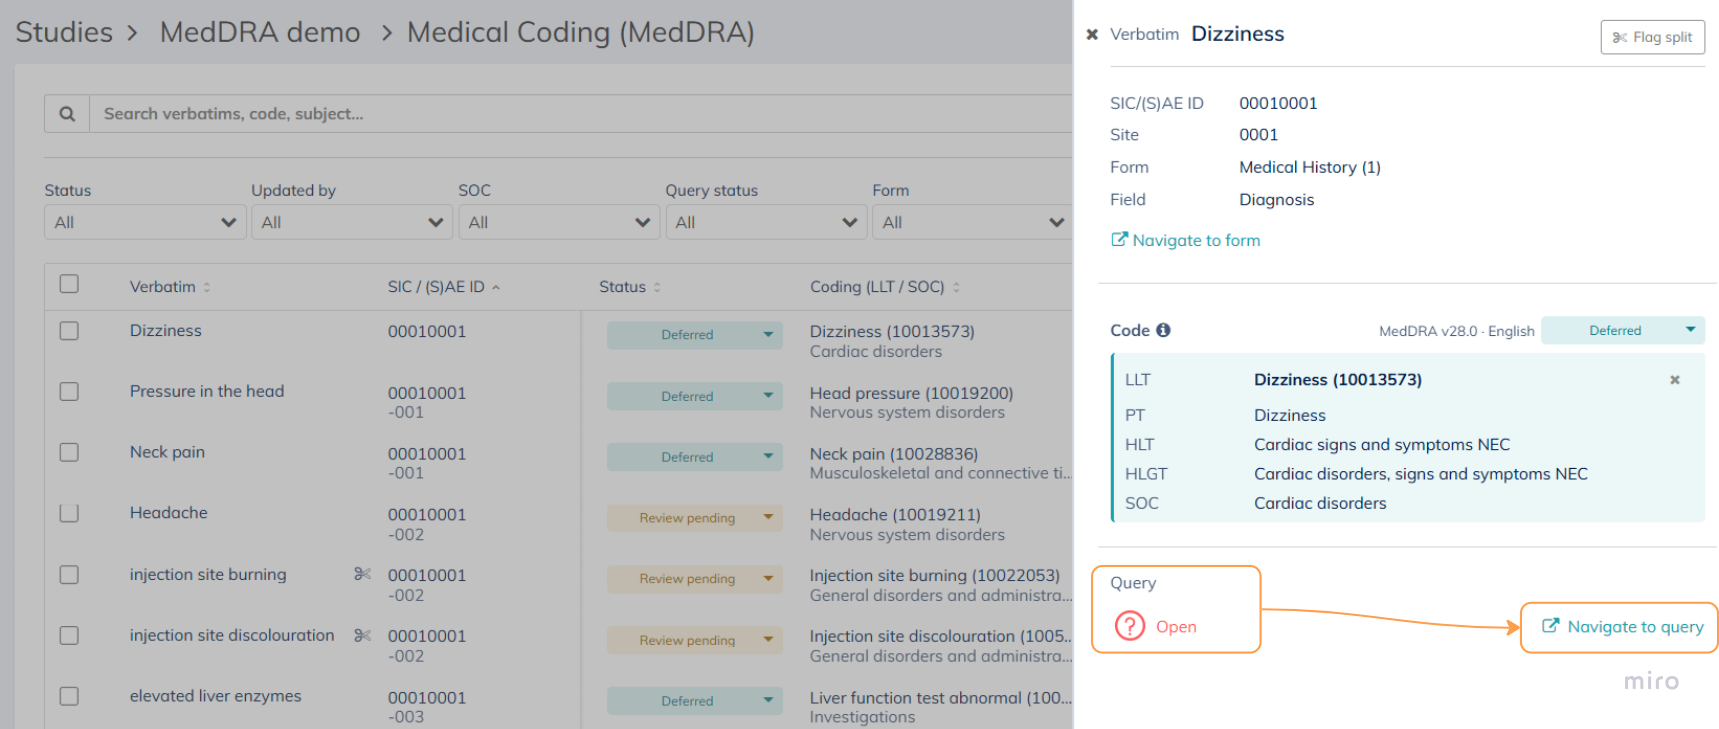
The panel shows:
- Header — the verbatim text, a status dropdown (see Section 3.3), and the dictionary version and language used for the code (for example "MedDRA v27.1 · English"). The version and language are only shown when a code has been assigned.
- Context metadata — SIC or (S)AE ID, Site, Form (with the step name for scheduled events), Field (including the column index and column label when the field is a table column), and Row label (for table rows). A Navigate to form link opens the source form in a new tab (see Section 3.4).
- Current Code — a MedDRA hierarchy card showing LLT → PT → HLT → HLGT → SOC for the assigned code. An info icon appears for auto-coded codes. If no code is assigned, the card shows "No code assigned" instead.
- Query — the query status on the verbatim field, with a link to open the query in the eCRF when one exists (see Section 6).
- Footer — an Open coding view button that launches the full coding view (see Section 4).
3.2. Removing or changing the code
The remove (bin icon) button on the Current Code card removes the existing code. A confirmation dialog appears with the text: "Are you sure you want to remove this code? Removing the code will set the status to 'uncoded'."
To change (rather than remove) the assigned code, open the coding view and search for a replacement (see Section 4).
⭐ Good to know: Collaborators with the "Medical Coding: Read" right but without "Medical Coding: Update / Code" can view the side panel, but the remove (bin icon) button and the Open coding view button are not available to them. |
3.3. Updating the status
The status dropdown sits next to the Code section header in the side panel. Selecting a new value saves immediately.
Which options appear in the dropdown depends on the user's rights:
- A user with Update / Code sees Review pending, Deferred, and Re-code.
- A user with Approve additionally sees Approved.
- A user with only Read sees the status tag but no dropdown.
Uncoded is not a selectable option — it is only applied by the system when a code is removed or auto-coding cannot assign one.
3.4. Navigating to the source form
The Navigate to form link in the context metadata opens the scheduled event form or the (S)AE form that contains the verbatim, in a new browser tab.

⚠️ Important: The link is disabled for users whose role does not allow them to see the source data — for example, users without read scheduled events rights (or read (S)AEs rights) for the verbatim's site, users without access to the site, and users excluded from the form. |
4. The coding view: searching MedDRA and applying a code
4.1. Opening the coding view
The coding view is opened from the side panel's Open coding view button.
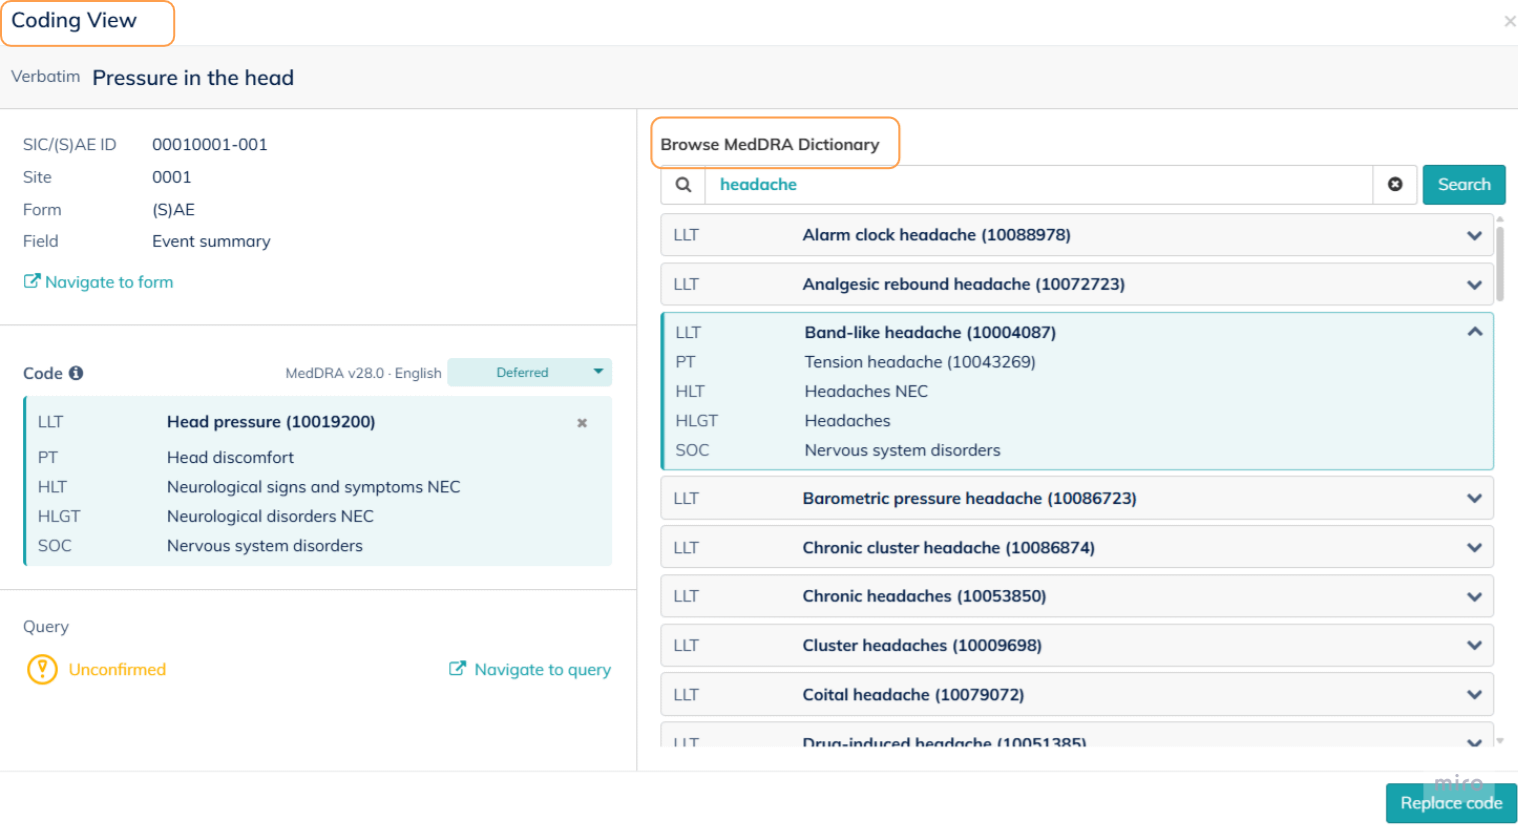
The title bar shows "Coding View" alongside the dictionary version and language (for example "MedDRA v27.1 · English"). The version and language are shown only when a code is present.
The verbatim header displays the verbatim text, or — for a split term — the split term text with the parent's original verbatim shown below it for reference.
The left column mirrors the side panel's context metadata and Current Code card (with the same remove and navigate behaviours). The right column is the Browse MedDRA Dictionary search panel.
4.2. Searching the MedDRA dictionary
The right column contains the Browse MedDRA Dictionary panel. Search works as follows:
- Type a term or MedDRA code into the search bar.
- Click the search button.
The search targets the Lowest Level Term (LLT) layer and returns matches for exact terms, partial text, alternative word order, and simple spelling variations.
Each result is shown as a clickable card displaying the full MedDRA hierarchy for that LLT (LLT → PT → HLT → HLGT → SOC).
4.3. Applying or replacing a code
The footer shows a contextual action button, enabled only when a result is selected:
- Apply code — shown when the verbatim has no code. Applying saves the selected code and moves the status from Uncoded to Review pending.
- Replace code — shown when a code is already assigned. Replacing saves the new code over the old one and leaves the current status unchanged.
The save action is instant when the button is clicked.
5. Splitting a verbatim into multiple terms
5.1. When to split
Some verbatims contain more than one medical concept in a single field — for example "Chest discomfort and palpitations with anxiety". Each concept needs its own MedDRA code, so the verbatim must be split into independent records before coding.
⭐ Good to know: Auto-coding also flags candidate verbatims for splitting when it detects multiple medical terms in the text, and proposes the terms in the side panel so the coder can confirm or adjust before creating the splits. |
5.2. Flagging and creating splits

From the side panel of the original verbatim:
- Click the Flag split button (with a scissors icon) in the header area. The button toggles to "Split flagged" and a Split Creator section appears in the side panel.
- Enter at least two terms in the numbered input fields. Add more lines with Add term, or remove extra lines (minimum two).
- Click Create Splits.
The original verbatim is archived and hidden from all views. For each entered term, a new independent record is created with the term as its verbatim, the parent's original text stored for reference, and all context fields inherited from the parent (site, form, field, SIC ID, (S)AE ID, seriousness, etc.). The first split term is automatically opened in the side panel.
⭐ Good to know: Split records are auto-coded immediately after creation. While the side panel is open, the overview and panel refresh to show the auto-coded status as soon as it is ready. |
⚠️ Important: A split term cannot itself be split — the Flag split button is not shown for records that are already split terms. This keeps split relationships one level deep. |
5.3. Working with sibling splits and un-splitting
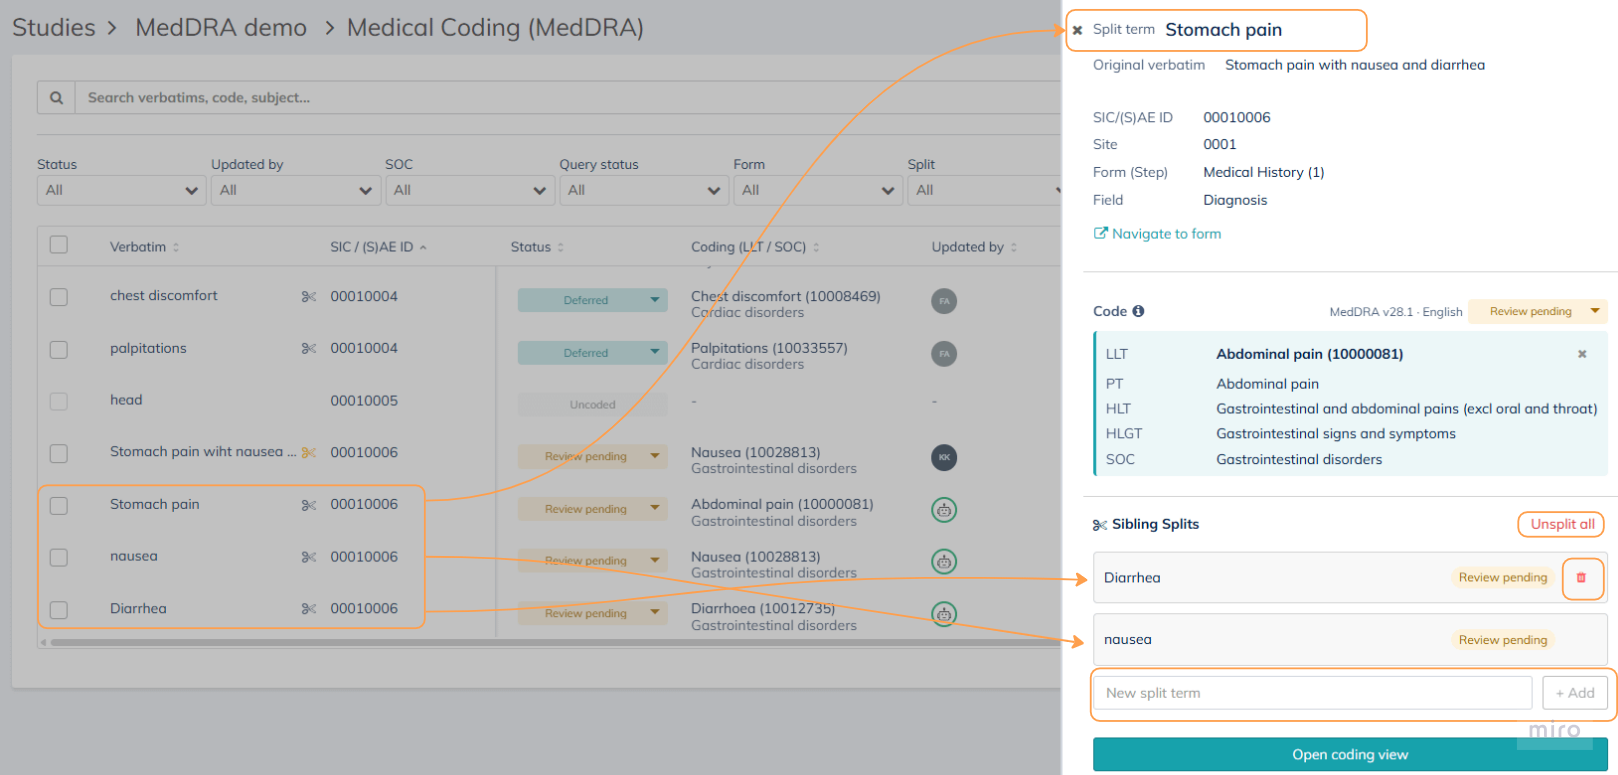
When a split term is opened in the side panel, the header reads Split term instead of Verbatim, and an Original Verbatim box below the title always shows the parent's full text for reference. A Sibling Splits section lists the other split terms of the same parent.
- Click any sibling card to jump to that sibling's detail view.
- Hover a sibling card and click the X icon to remove that single split. The remove icon only appears when more than two siblings remain.
- Use the Add split input at the bottom of the Sibling Splits section to add a new sibling term.
- Use Unsplit all to delete every sibling and restore the original parent verbatim. A confirmation dialog warns that all coding on the splits will be lost. After un-splitting, the parent is re-coded automatically and its new status depends on the auto-coding result.
6. Queries on verbatim fields
The Query column in the overview shows the current query status on the underlying verbatim field in the eCRF. The same status appears in the side panel and in the coding view, under a Query section. When a query exists, a link lets the reviewer open it directly in the eCRF.
⭐ Good to know: Queries are raised and managed on the verbatim's original input field in the scheduled event form or (S)AE form, not on the coding record. Resolving or replying to the query follows the usual query workflow described in the Query Overview article. |
7. Auto-coding and confidence
Auto-coding runs automatically every time a verbatim is entered or modified — no manual trigger is needed. Users see its results when a verbatim appears in the overview with a code already attached and the status Review pending, or remains Uncoded if no confident match could be found.
Auto-coding's Confidence score reflects how sure the system is of the assigned code, and is shown in three bands: High, Medium, or Low. On auto-coded rows, the system icon in the Updated by column has a colored border matching the confidence, and the Confidence filter (Section 2.3) narrows the overview to a specific band for faster review.
⭐ Good to know: To propose auto-coded codes Climedo uses AI in the process of finding terms to be coded. This speeds up repeat coding and keeps coding decisions consistent across subjects and studies. |
8. Exporting medical coding data
Verbatims together with their assigned MedDRA codes and surrounding context can be exported for downstream review, archiving, and submission. The export is available from the data export module; the standard export workflow applies.
Related article:
9. Access rights at a glance
Three role rights govern what can be done in the Medical Coding module:
- Medical Coding: Read — opens the module and shows every verbatim with its code and status. Read-only users see status tags but not the dropdown. Read is a prerequisite for the other two rights.
- Medical Coding: Update / Code — allows applying, replacing, and removing codes, changing verbatim statuses (except Approved), splitting and un-splitting verbatims, and using bulk status updates (except Approved).
- Medical Coding: Approve — allows moving verbatims into the Approved status, individually or in bulk.
Site access and read rights for scheduled events / (S)AEs are still enforced on the Navigate to form link and on bulk operations — even though the overview shows every verbatim, users cannot drill through to data they are not entitled to see.
Additional set-up related information can be found in the following article: How do I set up Medical Coding (MedDRA) (Step 7)?
✉️ Still have questions? Please contact your study coordinator. |
Was this article helpful?
That’s Great!
Thank you for your feedback
Sorry! We couldn't be helpful
Thank you for your feedback
Feedback sent
We appreciate your effort and will try to fix the article